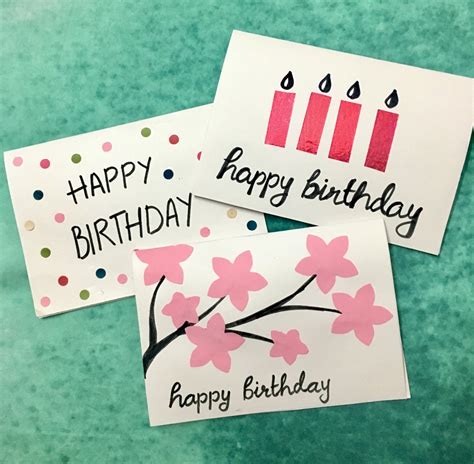
Sending a birthday greeting card is a heartfelt gesture that can make someone’s day. Instead of buying a generic card from the store, why not put in a little extra effort and create a personalized card that will be truly cherished? Here are 10 easy steps to help you create a stunning birthday greeting card:
-
Choose high-quality cardstock: The foundation of your card is important, so opt for sturdy cardstock that won’t tear or crease easily. Consider the weight and texture of the paper to match the tone of your message.
-
Pick a color scheme that reflects the birthday person: Consider their favorite colors or the theme of their birthday celebration. A cohesive color palette will give your card a polished look.
-
Decide on a design: Sketch out a rough idea of what you want your card to look like. This will help you determine the layout, fonts, and embellishments you’ll need.
-
Gather your materials: Before you start crafting, make sure you have all the necessary supplies, such as scissors, glue, markers, paint, and any other decorative elements you desire.
-
Create a focal point: Every great greeting card has a focal point that draws the eye. This could be a large image, a bold headline, or an intricate design.
-
Add layers and texture: Don’t be afraid to add layers and texture to your card to create visual interest. Use different types of paper, ribbons, lace, or fabric to enhance the design.
-
Personalize your message: The most important part of your card is the heartfelt message you write inside. Take the time to craft a meaningful message that expresses your love and well wishes.
-
Proofread carefully: Before you seal the envelope, take a moment to proofread your card for any errors in grammar, spelling, or punctuation.
-
Enclose a small gift (optional): If you wish to make your card extra special, consider enclosing a small gift, such as a gift card, a piece of jewelry, or a handwritten poem.
-
Present your card with pride: When you hand over your handmade birthday card, let the recipient know that you put thought and effort into creating it. Their smile and appreciation will make it all worthwhile.
Creating a personalized greeting card for a birthday is a way to show someone you care. With a little creativity and effort, you can create a card that will be cherished for years to come.
Tips for Designing Greeting Cards
-
Consider the occasion: Think about the specific birthday celebration and tailor your design accordingly. For example, a card for a child’s birthday might be more playful and colorful, while a card for an adult’s birthday might be more elegant and sophisticated.
-
Use high-quality materials: Cheap materials can make your card look and feel flimsy. Invest in good-quality cardstock, envelopes, and embellishments to create a professional-looking finished product.
-
Don’t overcrowd your design: A cluttered card can be difficult to read and appreciate. Use white space effectively to create a balanced and visually appealing design.
-
Add a personal touch: Make your card truly unique by adding a personal touch, such as a handwritten note, a photo of you and the recipient, or a special embellishment that reflects the recipient’s personality.
-
Proofread carefully: Before you seal the envelope, take a moment to proofread your card for any errors in grammar, spelling, or punctuation. A well-crafted message will make a lasting impression.
Creative Ideas for Greeting Cards
-
Pop-up cards: Create a card that pops up when opened to reveal a special message or image.
-
Quilled cards: Use thin strips of paper rolled into coils to create intricate designs on your card.
-
Origami cards: Fold paper into intricate shapes to create a unique and eye-catching card.
-
Decoupage cards: Cut out images from magazines or newspapers and glue them onto your card to create a collage effect.
-
Embroidered cards: Use embroidery floss to stitch designs or messages onto your card.
Additional Tips for Making Greeting Cards
-
Use a ruler and pencil to ensure straight lines and even spacing: This will give your card a polished look.
-
Experiment with different fonts and lettering styles: Find a font that complements the overall design of your card.
-
Add embellishments sparingly: Too many embellishments can make your card look cluttered and unprofessional.
-
Let your creativity shine through: Don’t be afraid to experiment with different techniques and materials to create a card that is truly unique.
Benefits of Making Your Own Greeting Cards
-
Personalization: Homemade cards allow you to express your own unique style and creativity.
-
Cost-effective: Making your own cards can be much cheaper than buying them from a store.
-
Sentimental value: A handmade card is a thoughtful and meaningful gift that will be cherished by the recipient.
-
Stress relief: Crafting can be a relaxing and enjoyable way to de-stress.
-
Environmental friendly: By reusing materials and reducing waste, making your own cards can be a more eco-friendly option.
Frequently Asked Questions
-
What is the best type of paper to use for greeting cards?
High-quality cardstock is the best choice for greeting cards. It is sturdy, durable, and provides a smooth surface for writing and embellishing. -
What size should a greeting card be?
Standard greeting card sizes include 4.25 x 5.5 inches, 5 x 7 inches, and 8.5 x 11 inches (folded). You can also choose custom sizes to fit your specific needs. -
What are some creative ways to decorate a greeting card?
Some creative ways to decorate greeting cards include using stickers, washi tape, glitter, sequins, fabric, paint, and even food items like dried flowers or spices. -
How can I add a personal touch to my greeting card?
You can add a personal touch to your greeting card by writing a heartfelt message, including a photo or memento, or using embellishments that reflect the recipient’s personality. -
What are some tips for making greeting cards for kids?
When making greeting cards for kids, use bright colors, fun shapes, and simple designs. Encourage them to use their imagination and creativity.
Conclusion
Making your own birthday greeting cards is a fun and rewarding way to show someone you care. With just a few simple materials and some creativity, you can create a card that will be treasured for years to come. So get crafty and let your imagination run wild!
Tables
Table 1: Greeting Card Sizes
| Size | Dimensions |
|---|---|
| Standard | 4.25 x 5.5 inches |
| Large | 5 x 7 inches |
| Jumbo | 8.5 x 11 inches (folded) |
Table 2: Cardstock Weights
| Weight | Description |
|---|---|
| 65 lb | Lightweight, suitable for simple designs |
| 80 lb | Medium weight, good for most greeting cards |
| 110 lb | Heavyweight, durable and ideal for cards with intricate designs |
Table 3: Embellishment Ideas for Greeting Cards
| Embellishment | Description |
|---|---|
| Stickers | Self-adhesive decorations in various shapes and sizes |
| Washi tape | Decorative masking tape available in a wide range of patterns and colors |
| Glitter | Fine particles that add sparkle and shine |
| Sequins | Small, shiny discs that can be glued or sewn onto cards |
| Fabric | Small pieces of fabric can be used to create accents or backgrounds |
Table 4: Creative Greeting Card Ideas
| Idea | Description |
|---|---|
| Pop-up cards | Cards that feature three-dimensional elements that pop up when opened |
| Quilled cards | Cards decorated with thin strips of paper rolled into coils |
| Origami cards | Cards folded from a single sheet of paper into intricate shapes |
| Decoupage cards | Cards decorated with images cut out from magazines or newspapers and glued onto the surface |
| Embroidered cards | Cards decorated with embroidery floss stitched into designs or messages |


