Introduction
Moving around the world or applying for official documents such as visas and passports can be a hassle if you don’t have the right passport-sized photo. Meeting the strict requirements set by various countries can be daunting, but with the right tools and a little know-how, you can easily edit your own passport-sized photo from the comfort of your home.

Understanding Passport Photo Requirements
Before diving into the editing process, it’s crucial to familiarize yourself with the specific requirements for passport photos. Different countries have varying regulations, but some common guidelines include:
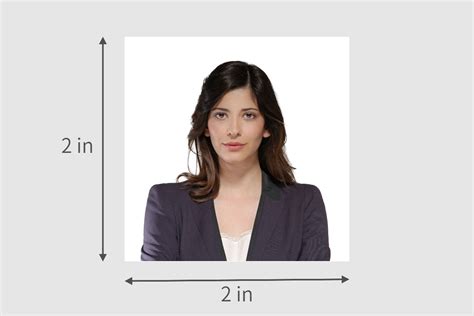
- Size: Typically 2 inches x 2 inches (51mm x 51mm) or as specified by the issuing authority.
- Background: Plain white or off-white background.
- Facial Expression: Neutral expression, eyes open, mouth closed.
- Head Position: Full face view, head centered.
- Clothing: Avoid wearing white or clothing that blends with the background.
Step-by-Step Editing Guide
Step 1: Acquire a Suitable Image
- Choose a high-resolution photo that meets the size requirements.
- Ensure the lighting is even and there are no shadows on your face.
- Wear appropriate clothing and have a neutral expression.
Step 2: Use a Photo Editing App or Software
There are numerous free and paid photo editing tools available, such as:
- Adobe Photoshop
- GIMP
- Canva
- Passport Photo Maker
Choose an app or software that aligns with your skill level and budget.
Step 3: Crop and Resize
- Import your photo into the editing software.
- Use the crop tool to create a 2-inch x 2-inch square.
- Resize the image to fit the required dimensions.
Step 4: Adjust Brightness and Contrast
- Adjust the brightness and contrast to ensure your photo is well-lit and clear.
- Make subtle adjustments to avoid over- or under-exposure.
Step 5: Remove Background
- Use the background removal tool to remove any unwanted background.
- Create a plain white or off-white background.
Step 6: Check Guidelines Compliance
- Ensure your photo meets all the passport requirements, such as size, background color, and facial expression.
- Refer to the official guidelines for your specific country.
Step 7: Save and Print
- Save your edited photo in a high-resolution format, such as JPEG or PNG.
- Print your photo on high-quality paper or use a professional photo printing service.
Troubleshooting Common Issues
Issue: Photo is too dark or too light.
Solution: Adjust the brightness and contrast settings in the editing software.
Issue: Background is not completely removed.
Solution: Use a more advanced background removal tool or manually remove any remaining imperfections.
Issue: Photo size is incorrect.
Solution: Double-check the required dimensions and resize your photo accordingly.
Conclusion
Editing passport-sized photos is a straightforward process that can save you time and money. By following these simple steps and using the right tools, you can create professional-looking passport photos that meet the requirements of most countries. Remember to check the specific guidelines for your destination to ensure your photo complies with all regulations.


