Introduction

Applying for a passport can be a daunting task, especially when it comes to taking the perfect photo. However, with careful preparation and adherence to specific guidelines, you can ensure a professional and acceptable passport photo. This comprehensive guide will provide you with step-by-step instructions and helpful tips to achieve a passport photo that meets all official requirements.
10 Steps to Perfect Passport Photo
Step 1: Check Requirements
Before you begin, ensure you are familiar with the specific passport photo requirements set by the passport issuing authority in your country. These requirements may include:
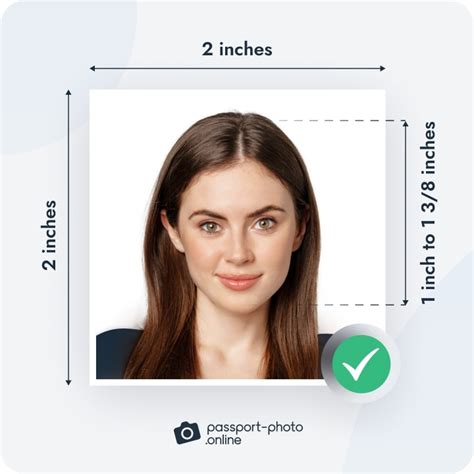
- Size: Standard size is usually 2 x 2 inches (51 x 51 millimeters)
- Background: White or off-white background
- Head Position: Face forward, looking directly at the camera
- Eyes: Open and visible, without glasses or sunglasses
- Expression: Neutral expression, mouth closed
- Attire: Plain colored clothing, no hats or head coverings (unless for religious reasons)
Step 2: Choose the Right Clothing
Select plain colored clothing, preferably in a dark color such as navy blue or black. Avoid white, as it may blend with the background. Avoid clothing with patterns or logos, as they can be distracting.
Step 3: Prepare the Background
Choose a white or off-white background. You can use a plain wall, a large sheet of paper, or a commercial backdrop. Ensure the background is evenly lit and free from shadows or wrinkles.
Step 4: Position Your Camera
Place your camera perpendicular to your face, at eye level. Avoid taking the photo from above or below, as this can distort your features. Use a tripod or steady yourself against a wall to prevent camera shake.
Step 5: Adjust Lighting
Ensure your face is evenly lit. Natural light is ideal, but you can also use a ring light or softbox. Avoid harsh shadows or overexposure.
Step 6: Position Your Head
Face forward and look directly at the camera. Keep your head straight, avoiding tilting or turning. Your eyes should be open and visible, without glasses or sunglasses.
Step 7: Maintain Neutral Expression
Your expression should be neutral, with your mouth closed and your eyes relaxed. Avoid smiling or frowning, as this can affect the accuracy of facial recognition systems.
Step 8: Take Multiple Photos
Take several photos to increase your chances of getting a perfect shot. Experiment with different angles or expressions to find the one that best captures your likeness.
Step 9: Review and Select
Once you have taken multiple photos, review them carefully. Choose the photo that best meets the requirements, with the clearest image and most accurate representation of your features.
Step 10: Submit Your Photo
Follow the specific instructions provided by the passport issuing authority for submitting your photo. This may involve uploading it online or mailing it in. Ensure the photo meets all the requirements before submitting it.
Effective Strategies for Success
- Practice taking photos of yourself in front of a mirror to find the most flattering angle.
- Ask a friend or family member to assist with taking the photo for a more objective perspective.
- Use a passport photo app to ensure your photo meets the correct dimensions and background requirements.
- If possible, get your passport photo taken by a professional photographer, as they have the expertise and equipment to capture a high-quality image.
Tips and Tricks
- Remove any jewelry, headbands, or scarves that may obstruct your face.
- Apply light makeup to even out your skin tone, but avoid heavy makeup or bright colors.
- Brush your hair and style it in a way that keeps it out of your face.
- If you have bangs, ensure they are swept to the side or pinned back.
- If you wear glasses, remove them for the photo.
- Relax and take a few deep breaths before taking the photo to help you achieve a natural and relaxed expression.
Common Mistakes to Avoid
- Taking a photo with an incorrect background or dimensions.
- Wearing inappropriate clothing or accessories.
- Having your face obstructed or shadowed.
- Submitting a photo with closed eyes or an expression that does not match the requirements.
- Using a photo that is too old or does not accurately represent your current appearance.
Conclusion
Taking a passport photo may seem like a simple task, but adhering to the specific guidelines and using the tips provided in this guide will ensure you capture a professional and acceptable image. By following these 10 easy steps and avoiding common mistakes, you can submit a passport photo that accurately represents your likeness and meets all official requirements.
Additional Resources
- Passport Photo Generator
- U.S. Department of State Passport Photo Requirements
- International Civil Aviation Organization (ICAO) Passport Photo Standards
Tables
Table 1: Passport Photo Size Requirements
| Country | Size |
|---|---|
| United States | 2 x 2 inches (51 x 51 mm) |
| United Kingdom | 35 x 45 mm |
| Canada | 50 x 70 mm |
| Australia | 45 x 35 mm |
Table 2: Background Color Requirements
| Country | Background Color |
|---|---|
| United States | White or off-white |
| United Kingdom | Cream or light blue |
| Canada | White or gray |
| Australia | White |
Table 3: Face Position and Expression Requirements
| Country | Face Position | Expression |
|---|---|---|
| United States | Facing forward | Neutral |
| United Kingdom | Facing forward | Neutral |
| Canada | Facing forward | Neutral |
| Australia | Facing forward | Neutral |
Table 4: Clothing and Accessories Requirements
| Country | Clothing | Accessories |
|---|---|---|
| United States | Plain colored clothing | No hats or head coverings |
| United Kingdom | Plain colored clothing | No hats or head coverings |
| Canada | Plain colored clothing | No hats or head coverings, unless for religious reasons |
| Australia | Plain colored clothing | No hats or head coverings, unless for religious reasons |


